Are you ready to share your expertise with the world? First of all, the Kajabi training platform makes it easy to build, manage, and sell online courses. Whether you are a coach, educator, or entrepreneur, Kajabi training platform gives you all the tools you need in one place. So, let us walk through exactly how to create a portal on this powerful platform.
7 Powerful Kajabi Course Creation Services that Skyrocket Sales
What Is a Kajabi Portal?
First, let us understand what a portal is. Basically, in Kajabi, a portal is your personal online space. It is where your content lives. In other words, it is where your students log in, access courses, and connect with your brand. Therefore, think of it as your own branded learning hub.
Here is what a Kajabi portal includes:
- First of all, a custom homepage for your brand
- Additionally, a login page for your students
- Moreover, a library of your courses and products
- Furthermore, a community space for discussions
- Finally, a dashboard for student progress
Since Kajabi is a complete kajabi course platform, you do not need any third-party tools to get started.
Why Use Kajabi for Your Online Training?
Before we dive into the steps, let us talk about why Kajabi is a great choice. In fact, thousands of creators use it every day.
Here are the top reasons people love Kajabi:
- First, it combines courses, emails, and payments in one place
- Additionally, it is beginner-friendly with no coding needed
- Moreover, it has beautiful templates ready to use
- Furthermore, it offers 24/7 customer support
- Finally, it works on mobile and desktop devices
So, if you want an all-in-one solution, then Kajabi is the right choice for you. As a result, you save both time and money.
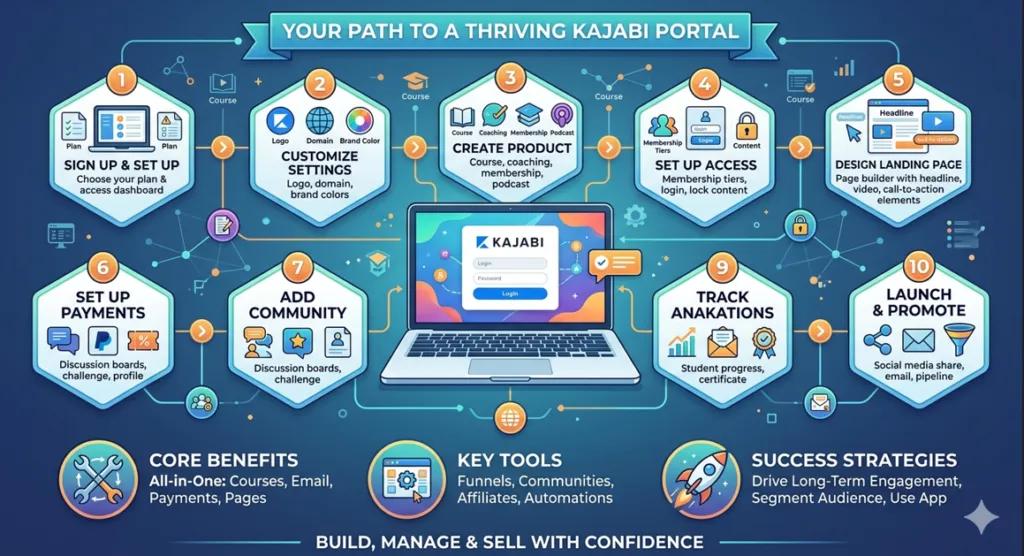
Step 1: Sign Up and Set Up Your Account
To begin, go to Kajabi’s website and create your account. Then, choose a plan that fits your needs. After signing up, you will land on your dashboard. Therefore, this is the control center of your Kajabi learning platform. From here, you can manage everything products, members, emails, and more.
Here is what you can do from your dashboard:
- First, view your total revenue and sales
- Next, check your active members
- After that, access your products and courses
- Then, send emails to your audience
- Finally, track your site performance
Step 2: Customize Your Portal Settings
Next, head to the “Settings” section. Then, click on “Site Details” to add your brand name, logo, and domain. This step is important because it makes your portal look professional. In addition, it builds trust with your students right away.
You can customize these things in settings:
- First of all, your site name and tagline
- Additionally, your brand logo and favicon
- Moreover, your primary and secondary colors
- Furthermore, your custom domain name
- Finally, your font styles
Additionally, you can set your brand colors and fonts here. As a result, your students will enjoy a consistent and polished experience every time they log in.
Step 3: Create Your First Product
Now, it is time to build your course. Therefore, go to “Products” and click “New Product.” Kajabi offers several formats to choose from. In fact, you have many great options.
Here are the product types you can create:
- First, online courses with video lessons
- Then, mini-courses for quick learning
- After that, coaching programs with one-on-one sessions
- Moreover, membership sites for recurring income
- Finally, podcast or audio content hubs
Since the Kajabi online training platform supports many content types, you can upload videos, PDFs, quizzes, and audio files easily. Moreover, you can organize your content into categories and modules. As a result, your students will have a smooth and enjoyable learning flow.
Step 4: Set Up Your Portal Access
After creating your product, you need to set up who can access your portal. So, go to “Settings” and then “Member Portal.” Here, you can control the full student experience. In addition, you can make it feel personal and welcoming. The Kajabi training platform gives you full control over every access setting with just a few clicks.
You can manage access in these ways:
- First, set free or paid access levels
- Then, offer trial periods for new students
- After that, lock content until a student completes a lesson
- Furthermore, give special access to VIP members
- Finally, create different membership tiers
Furthermore, you can add a welcome message and customize navigation menus. Therefore, this makes your kajabi employee training platform setup clean and user-friendly for any team or audience.
Step 5: Design Your Landing Page
Therefore, the next step is to create a landing page on Kajabi training platform . So, use Kajabi’s built-in page builder to design a page that turns visitors into members. Since no coding is required, this process is fast and simple. In fact, anyone can do it.
A great landing page should include:
- First, a strong headline that grabs attention
- Then, a short description of your course
- After that, a list of what students will learn
- Moreover, testimonials from happy students
- Finally, a clear call-to-action button
You can drag and drop all these elements into place. So, as a result, your page will look great without any design skills.
Step 6: Set Up Payments and Pricing
Before you launch, you need to get paid. Therefore, go to “Settings” and click on “Payments.” Then, Kajabi connects directly with Stripe and PayPal. So, you can start accepting payments right away.
Here are the pricing options you can set up:
- First, one-time payment for lifetime access
- Additionally, monthly or yearly subscription plans
- Moreover, payment plans split into installments
- Furthermore, free access for lead generation
- Finally, coupon codes for special discounts
This gives your students flexible options. Consequently, more people are likely to buy your course. As a result, your revenue will grow steadily over time.
Step 7: Add a Community to Your Portal
Next, a strong community keeps students engaged. Therefore, Kajabi lets you add a built-in community space to your portal. So, students can ask questions, share wins, and support each other.
Here is what you can do in your community:
- First, post announcements and updates
- Then, create topic-based discussion channels
- After that, host challenges and events
- Moreover, feature top members and winners
- Finally, celebrate student milestones
Moreover, an active community makes your portal more valuable. Consequently, students will stay longer and refer others to your platform.
Step 8: Use Automations to Save Time
Additionally, Kajabi has powerful automation tools. Therefore, you can set up triggers to send emails, unlock content, or tag members automatically. As a result, you save hours of work every single week.
Here are some useful automations to set up:
- First, send a welcome email when someone joins
- Then, unlock the next module after a lesson is completed
- After that, send a reminder if a student has not logged in
- Furthermore, tag members based on what they purchased
- Finally, send a certificate when a course is finished
In addition, automations help you deliver a smooth and professional experience to every student. So, your business runs on autopilot even when you are offline.
Step 9: Track Your Progress With Analytics
After you launch, you need to know what is working. Therefore, Kajabi gives you a clear analytics dashboard. So, you can see your full business performance at a glance. The Kajabi training platform makes it simple to understand your numbers and take action fast.
Here is what you can track:
- First, total revenue and monthly growth
- Then, number of active and new members
- After that, course completion rates
- Moreover, email open and click rates
- Finally, landing page conversion rates
Furthermore, you can use this data to make smart decisions. Consequently, your business will grow faster over time. In addition, you will know exactly where to improve.
Step 10: Launch and Promote Your Portal
Finally, you are ready to go live! So, before launching, preview your portal to make sure everything looks great. Then, use Kajabi’s marketing tools to spread the word.
Here are the best ways to promote your portal:
- First, share it on your social media profiles
- Then, send a launch email to your list
- After that, run a limited-time discount offer
- Moreover, partner with other creators for cross-promotion
- Finally, use Kajabi’s built-in pipeline funnels
In addition, you can connect your social media and run pipelines to attract new students. Consequently, your business can grow even while you sleep.
Tips to Make Your Portal Stand Out
Moreover, here are a few quick tips to make your portal even better. In fact, these tips work great on the Kajabi training platform for creators at every level:
- First of all, keep your design clean and simple
- Additionally, use short video lessons under ten minutes
- Moreover, add a welcome video on your homepage
- Furthermore, update your content regularly
- Also, ask students for feedback and reviews
- In addition, offer bonus materials to add more value
- Finally, celebrate student progress with badges or certificates
References
Official Website: Visit Kajabi.com to explore their features.
Strategies for Effective Distance Learning Frameworks A structured framework archived in the ERIC Database that maps out educational technology models, platform selection, and curriculum delivery systems.
Selecting The Optimal E-Learning Platform for Universities A mathematical evaluation published in The European Journal of Research and Development that analyzes global cloud learning networks and commercial software tools like Kajabi.
Final Thoughts
In conclusion, creating a portal on the Kajabi training platform does not have to be hard. By following these steps, you can build a professional learning space fast. Moreover, whether you are just starting out or growing an existing business, Kajabi has everything you need. Therefore, take action today and turn your knowledge into a thriving online course business!
FAQs
What are some best practices for Kajabi training?
Start with a clear product and pricing plan, use Kajabi Funnels to bootstrap launches, and automate welcome emails. To drive long-term engagement, segment your audience, optimize for the mobile app, and use student feedback alongside built-in community spaces to keep your content fresh.
What type of platform is Kajabi?
Kajabi is an all-in-one business hub for creators and entrepreneurs. This makes the Kajabi training platform much more than a basic course builder. You can host training programs, run coaching practices, and build active communities. Best of all, it handles your entire website, email marketing, and payments in one single dashboard.
Which is better, Kajabi or teachable?
Kajabi is better if you want a complete business hub, while Teachable is best if you only want to host basic courses. The Kajabi training platform costs more upfront, but it gives you built-in tools for email marketing, sales funnels, and podcasts with 0% platform fees. Teachable has cheaper entry plans but enforces strict product limits and charges a heavy 7.5% transaction fee on its lower tier.
Authored by: Laiba Ayaz