Do you want to migrate Teachable to LearnDash? Good, you are in the right place.
First, know this: thousands of creators make this move every year. Moreover, most of them wish they had a clear checklist before diving in. Consequently, we created this step-by-step roadmap to make your transition completely stress-free.
This guide walks you through every phase of the process. Because LearnDash runs on WordPress, you will finally own your site, your data, and your revenue. However, a successful switch does take careful planning. Therefore, read this fully before you touch anything on your Teachable dashboard.
Key Takeaways
- Plan first. Do not skip prep work.
- No auto-tool exists. Instead, you move content by hand.
- Students need care. So export them before you start.
- Test everything. Never go live without checking first.
- Time needed: 3 days to 4 weeks, based on size.
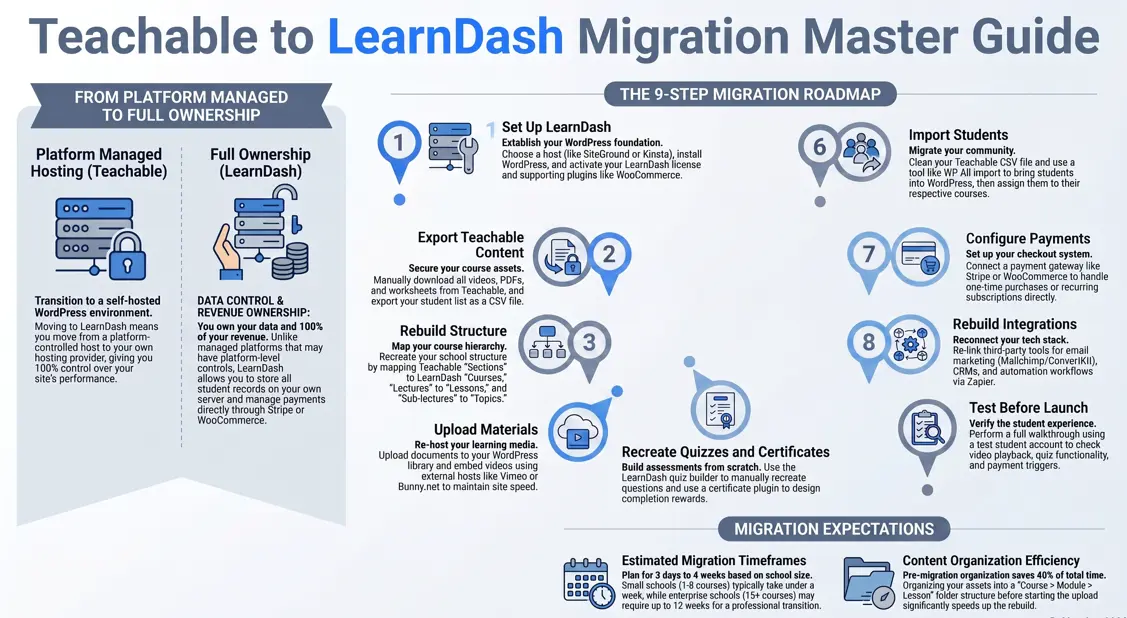
What Happens During a Teachable to LearnDash Migration?
So, what actually changes during this switch? In short, quite a lot changes, but the entire process is very manageable.
Teachable hosts your school for you. LearnDash, on the other hand, runs on your own WordPress site. As a result, you move from a managed platform to full ownership. While managing this yourself gives you complete control, you can also leverage professional platform-to-platform migration services to handle the technical data transfer safely with zero downtime.
Therefore, to help you visualize the shift, here is a quick side-by-side look:
| Area | Teachable | LearnDash |
|---|---|---|
| Hosting | Managed for you | Your own host |
| Payments | Built in | WooCommerce or Stripe |
| Quizzes | Built in | LearnDash quiz builder |
| Certificates | Basic only | Custom via plugin |
| Student Data | On Teachable | On WordPress |
| Ownership | Platform controls it | You own it fully |
Course Content
All your lessons live on Teachable’s servers. Therefore, you must download each file first. After that, you re-upload everything to your new WordPress site.
Student Data
Student records stay locked inside Teachable. So you export them as a CSV file. Then you import that file into WordPress.
Quizzes and Assessments
Quiz data does not move on its own. As a result, you must rebuild each quiz by hand inside LearnDash. However, the quiz builder makes this fairly straightforward.
Certificates
Teachable certificates are image-based files. Unfortunately, they do not transfer over. Therefore, you recreate them using a LearnDash certificate plugin.
Payment Systems
Teachable handles billing natively. But after you migrate Teachable to LearnDash, you need a new payment setup, such as WooCommerce or Stripe instead.
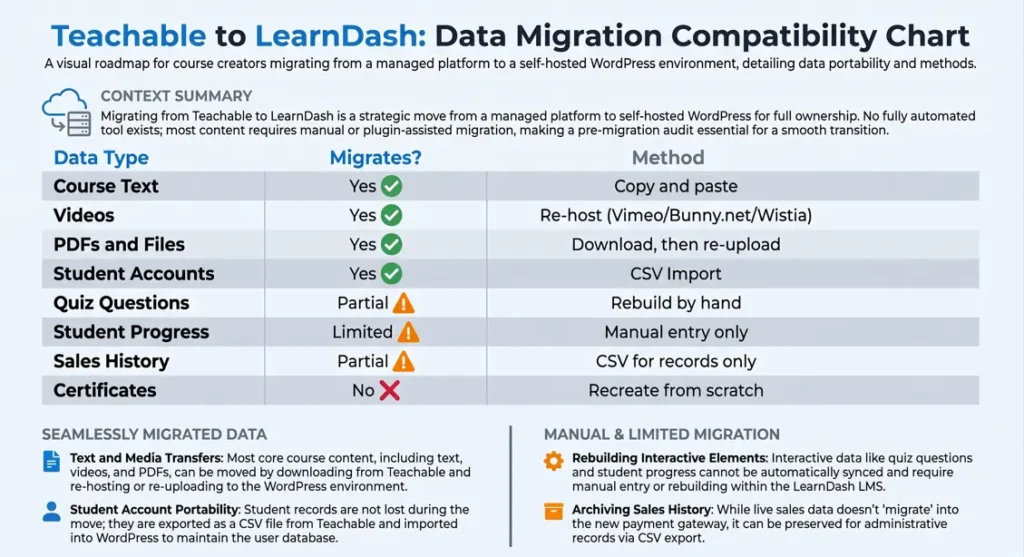
What Data Can Be Migrated?
Not all data moves the same way. So check this table before you plan your timeline:
| Data Type | Migrates? | Method |
|---|---|---|
| Course text | Yes | Copy and paste |
| Videos | Yes | Download, then re-host |
| PDFs and files | Yes | Download, then re-upload |
| Student accounts | Yes | CSV import |
| Quiz questions | Partial | Rebuild by hand |
| Student progress | Limited | Manual entry only |
| Certificates | No | Recreate from scratch |
| Sales history | Partial | CSV for records only |
Now you know what to expect. Moreover, this table helps you build a realistic timeline right away.
Pre-Migration Checklist
Before you migrate Teachable to LearnDash, complete these five steps. Skipping even one is the most common mistake creators make.
Audit Existing Courses
First, open every course in your Teachable school. Then list every lesson, video, quiz, and file inside each one. Also note which courses are live, which are drafts, and which are retired. This audit becomes your migration roadmap.
Back Up Course Assets
Next, download all files from Teachable. For example, grab:
- videos
- PDFs and worksheets
- images and thumbnails
- audio files
After that, store everything in clearly labeled folders. A good naming format is: Course Name → Module → Lesson.
Export Student Information
After backing up assets, go to your Teachable dashboard. Then export your full student list as a CSV file. Make sure it includes:
- Full name
- Email address
- Enrolled courses
- Enrollment date
Document Integrations
Also write down every third-party tool connected to Teachable. For example:
- Email tools like Mailchimp or ConvertKit
- CRM tools like HubSpot
- Automation tools like Zapier or Make
You will need to reconnect all of these later. So document them now to save time.
Create a Migration Plan
Finally, write out a clear timeline. Decide whether both platforms will run at once during the switch. Also assign specific tasks to your team members. A written plan prevents chaos later.
Migration Methods: Which Option Is Best?
There are three ways to do a LearnDash migration. Each one fits a different school size and budget.
| Method | Best For | Cost | Time |
|---|---|---|---|
| Manual | 1–5 courses | Low | High |
| Plugin-Assisted | 5–15 courses | Medium | Medium |
| Professional Service | 15+ courses | High | Low |
Manual Migration
With this method, you do all the work yourself. However, it costs the least money. So it works well for small schools with fewer than five courses.
Plugin-Assisted Migration
Tools like WP All Import speed up the student import process significantly. Nevertheless, you still move media files and quizzes by hand. But overall, this option saves a lot of time for mid-size schools.
Professional Migration Service
If you have thousands of students, hire a WordPress developer instead. As a result, you save weeks of effort and reduce the chance of errors. Furthermore, this option protects your SEO and URL structure during the move.
Teachable to LearnDash Migration Checklist
Now let us walk through every step in order. Follow each one carefully for the best results.
Step 1: Set Up LearnDash
Install WordPress
First, choose a reliable hosting provider. For example, these are popular picks:
- WP Engine: fast and reliable
- SiteGround: affordable and beginner-friendly
- Kinsta: best for high-traffic LMS sites
Install LearnDash
Next, buy a LearnDash license at learndash.com. After that, install and activate it inside WordPress. Then run through the setup wizard to complete the basics. (If you are still on the fence about whether WordPress is the right path, checking out a detailed LearnDash vs LifterLMS comparison can confirm if LearnDash’s structured reporting fits your specific goals).
Configure LMS Settings
Now set these key options inside LearnDash:
- Course access type (free, paid, or subscription)
- Student dashboard page
- Email alerts for new enrollments and completions
Choose Supporting Plugins
You will also need a few extra plugins. Here are the essential ones:
| Plugin | What It Does |
|---|---|
| WooCommerce | Handles payments |
| Elementor | Builds course pages |
| UpdraftPlus | Backs up your site |
| Yoast SEO | Boosts search rankings |
| GamiPress | Creates certificates |
Step 2: Export Content From Teachable
Export Videos
First, open each course inside Teachable. Then download each video file one by one. After that, upload them to Vimeo, Bunny.net, or Wistia for fast, reliable playback.
Download Documents
Next, grab every PDF, worksheet, and resource file from Teachable. Then sort them into folders organized by course and lesson.
Save Course Structure
Also take screenshots of each course layout inside Teachable. Note the exact order of modules, lessons, and topics. This becomes your rebuild blueprint in the next step.
Export Student Records
Finally, head to Teachable’s reporting section. Then export your full student list as a CSV. Keep that file safe throughout the entire migration process.
Step 3: Rebuild Course Structure
Create Courses
In LearnDash, create a new course for each existing Teachable course. Then match the title, description, and thumbnail exactly to keep things consistent.
Add Lessons
LearnDash uses a three-level structure. So map your Teachable content like this:
| Teachable | LearnDash Equivalent |
|---|---|
| Section | Course |
| Lecture | Lesson |
| Sub-lecture | Topic |
Create Topics
Add each topic under its correct parent lesson. Then arrange them in the same order they appeared in Teachable.
Finally, choose how students move through the course:
- Free: students jump to any lesson
- Linear: students must finish each lesson first
- Random: students choose freely
Linear mode works best for structured programs.
Step 4: Upload Learning Materials
Upload Videos
First, paste embed codes from Vimeo or YouTube into each lesson. Also, never upload large video files directly to WordPress. Doing so will slow your site down significantly.
Add PDFs and Downloads
Next, upload PDF files to your WordPress media library. After that, link each file inside the correct lesson using the LearnDash editor.
Embed External Resources
Finally, add links to any outside tools, articles, or third-party resources. Place each one inside the lesson where it belongs.
Step 5: Recreate Quizzes and Certificates
Build Quizzes
Use the LearnDash quiz builder to recreate every quiz. It supports these question types:
- Multiple choice
- True or false
- Fill in the blank
- Essay answers
- Sorting questions
Configure Passing Criteria
For each quiz, also set these options:
- Pass score percentage
- Maximum attempts allowed
- Time limit per attempt
- Whether to show correct answers after submission
Create Certificates
Build each certificate inside the LearnDash certificate editor. Then set the trigger, for example, course completion or a passed quiz.
Step 6: Import Students
Prepare Student Data
First, you need to clean your CSV file from Teachable. Specifically, make sure every single row includes a valid email address, a full name, and the correct course name before you upload it.
Import Users
Next, use WP All Import to bring all students into WordPress. Also send a welcome email straight away with their login details and a password reset link.
Assign Course Access
After importing your users, your next step is to assign each student to their correct courses. However, if you have large groups of people, you should use the built-in LearnDash group enrollment feature instead. As a result, you will save a lot of time.
Step 7: Configure Payments
Select a Payment Gateway
WooCommerce is the most popular payment solution for LearnDash. Furthermore, it supports hundreds of gateways worldwide. Also, it connects directly to LearnDash through an official add-on.
Configure One-Time Payments
Create a WooCommerce product for each course. Then link it to the correct LearnDash course. As a result, students get enrolled automatically right after completing their purchase.
Configure Subscriptions
If you offer a membership model, you can use WooCommerce Subscriptions to handle your payments. Alternatively, MemberPress works very well too, especially since it connects perfectly with LearnDash access rules.
Step 8: Rebuild Integrations
Email Marketing Tools
First, reconnect your email marketing platform. For instance:
- Mailchimp → use the Mailchimp for WordPress plugin
- ConvertKit → connect via Zapier
- ActiveCampaign → use the official LearnDash add-on
CRM Platforms
Next, reconnect your CRM tool through Zapier or a native plugin. Then recreate the same triggers you had set up inside Teachable.
Analytics Tools
After that, install Google Analytics 4 on your WordPress site. Then set up conversion goals for:
- New course enrollments
- Quiz completions
- Successful purchases
Automation Workflows
Finally, rebuild all your Zapier or Make automation flows. Also update each trigger so it points to LearnDash or WooCommerce instead of Teachable.
Step 9: Test Before Launch
Student Experience Testing
First, create a test student account. Then enroll in every course and go through each lesson. Also complete every quiz and try to download each certificate. Fix any broken links or missing content before going live.
Payment Testing
Next, run a test transaction using Stripe’s test mode or WooCommerce sandbox. Then confirm that student enrollment triggers correctly right after payment.
Mobile Testing
Also open your new site on a smartphone and a tablet. Check that:
- Videos play correctly
- PDFs open without issues
- Navigation is smooth on small screens
Performance Testing
Finally, run your site through GTmetrix or Google PageSpeed Insights. If load times are slow, optimize images and enable a caching plugin. A fast site keeps students engaged and reduces bounce rates.
Troubleshooting Common Migration Issues
Even with careful planning, problems can appear. So use this quick-fix table:
| Problem | Cause | Fix |
|---|---|---|
| Empty lessons | Wrong course tier | Move content to correct Course/Lesson/Topic level |
| Students can’t log in | Welcome email in spam | Resend with a direct password reset link |
| Broken internal links | URL structure changed | Use Broken Link Checker plugin to find and fix |
| Quiz not saving scores | Not linked to a lesson | Reassign the quiz to the correct lesson |
| No enrollment after purchase | WooCommerce not linked | Re-link the WooCommerce product to the course |
Best Practices for a Successful Migration
Preserve SEO During Migration
First, set up 301 redirects from all old Teachable URLs to your new LearnDash pages. Then submit your updated sitemap to Google Search Console right after launch. As a result, you protect your search rankings during the transition.
Research confirms that URL continuity is one of the most critical factors in preserving organic traffic after a platform switch.
Keep URL Structures Consistent
Wherever possible, try to match your new LearnDash course slugs to your old Teachable ones. Consequently, your 301 redirects will become much simpler to manage. In addition to this, Google can recrawl and reindex your content much faster this way, which ultimately protects your search rankings.
Test Before Going Live
Never point your live domain to the new site without completing a full test first. Instead, go through the entire student journey from signup to course completion. Then confirm that payments, emails, and certificates all work correctly.
Maintain Content Backups
After migration, set up automated backups using UpdraftPlus. Store them offsite in Google Drive or Amazon S3. That way, you can recover quickly if anything goes wrong.
Studies also confirm that proactive backup planning significantly reduces downtime during LMS platform transitions.
Teachable to LearnDash Migration Timeline
How long does it actually take to migrate Teachable to LearnDash? In reality, it largely depends on the size of your current course library. However, to give you a realistic idea, here is a clear breakdown of what you can expect:
| Size | Courses | Students | Estimated Time |
|---|---|---|---|
| Small | 1–3 | Under 200 | 3–7 days |
| Medium | 4–15 | 200–1,000 | 1–3 weeks |
| Enterprise | 15+ | 1,000+ | 4–12 weeks |
Small Course Migration
- Time: 3 to 7 days
- One to three courses only
- Fewer than 200 students
- One person can handle it solo
Medium-Sized Course Migration
- Time: 1 to 3 weeks
- Four to fifteen courses
- Several hundred students
- Plugin tools help significantly at this stage
Enterprise or Multi-Course Migration
- Time: 4 to 12 weeks
- More than fifteen courses
- Over 1,000 students enrolled
- Therefore, hire a professional developer for this size
Factors That Affect Migration Time
Several factors can extend your timeline. For instance:
- A large number of videos that need re-hosting
- Poorly organized content inside Teachable
- Complex quiz and certificate setups
- Running both platforms at the same time during transition
Research also shows that strong content organization before migration can cut total migration time by up to 40%.
References
- The effectiveness of online and blended learning: A meta-analysis of the empirical literature.
- Theories and frameworks for online education: Seeking an integrated model.
- GBlended learning: Uncovering its transformative potential in higher education.
Conclusion
In conclusion, there you have it, your clear plan to migrate Teachable to LearnDash. Indeed, by making this move, you gain full control of your content. Moreover, you will save on platform fees and unlock total design freedom.
However, a good move depends entirely on planning. Therefore, make sure you take these immediate steps:
- First, review all your current courses.
- Subsequently, save a copy of every single file and video.
- After that, follow the checklist steps in exact order.
In addition, always test everything before you launch. As a result, your students will not face any issues at all. Consequently, when you follow this guide, your journey to migrate Teachable to LearnDash will be smooth and stress-free. So, start with Step 1 today, and your new site can be ready within just a few days!
Frequently Asked Questions
Can I migrate Teachable to LearnDash automatically?
To be clear, no fully automatic tool exists for this process. However, you can use the WP All Import plugin to automate your student import. On the other hand, elements like course content, quizzes, and certificates will still require manual rebuilding.
Will my students lose access during the migration?
Not if you plan carefully. To prevent this, you should keep Teachable live while you are building your new LearnDash site behind the scenes. Then, make the switch to your new domain only after you have completed full testing.
Does LearnDash have all the features Teachable has?
Yes, and often even more. For example, LearnDash includes built-in features like drip content, interactive quizzes, certificates, assignments, and group management. However, because it is self-hosted, you must bring your own website hosting and payment solutions to the table.
How do I transfer Teachable students to LearnDash?
First, export your student list as a CSV from Teachable. Then import it into WordPress using WP All Import. After that, use LearnDash groups to assign course access in bulk.
Is it worth migrating from Teachable to LearnDash?
Yes, for most established creators it absolutely is. Teachable charges both monthly platform fees and transaction fees. LearnDash, on the other hand, is one annual license fee. Furthermore, you own your entire site. So the long-term savings are significant.
Can I keep my SEO rankings after migrating?
Yes, but only if you set up 301 redirects properly. In addition, you must submit your new sitemap to Google Search Console immediately. After that, be sure to monitor your search rankings closely for the first 60 days after your launch.
What is the best payment plugin for LearnDash?
Without a doubt, WooCommerce is the top choice for most LearnDash users. To start with, it integrates directly with the LMS through an official add-on plugin. Moreover, because it is so widely used, it seamlessly supports hundreds of local and international payment gateways worldwide. As a result, you can sell your courses effortlessly to anyone, anywhere.
How do I move course videos from Teachable to LearnDash?
First, download your videos from Teachable’s course editor. Then upload them to Vimeo, Bunny.net, or Wistia. Finally, paste the embed code into each corresponding LearnDash lesson.
How much does it cost to migrate Teachable to LearnDash?
Costs vary by method:
- Manual: Nearly free (LearnDash license ~$199/year)
- Plugin-assisted: $50–$150 in plugin tools
- Professional service: $500–$3,000 depending on school size
What happens to my Teachable affiliate links after migration?
Unfortunately, all Teachable affiliate links stop working after migration. Therefore, set up a new affiliate system on WordPress right away. Use a plugin like AffiliateWP or Pretty Links for this purpose.
Authored by: Laiba Ayaz